
Feb
Some people are fond of cultivating their food just because they are passionate about it. Growing magic mushrooms is a spiritual act for people who cultivate them. It isn’t always the easiest process, but using a spore kit can help you achieve the desired results and allow you to grow your own psilocybin shrooms.

Where to Grow Magic Mushrooms
If you want to grow psilocybin mushrooms at home, it is easy to do, so use a magic mushrooms spore kit. These are ready-to-grow kits containing fertile spores, so providing you have the right conditions, you can cultivate your own shrooms and experience the growing process for yourself.
If you are plowing the fungal spores from scratch, then be mindful that these delicate micro-organisms are exposed to the right amount of heat and humidity content in the air.[1] Shrooms can often be picky about their atmospheric conditions to grow well, so it’s important to prepare these conditions before setting up your spore kit.
How to Grow Magic Mushrooms

The procedure for growing these is pretty simple, but it is essential to provide optimal growing conditions.
Preparation Steps
- Prepare the jar for the process. Use disinfected tools to create small holes in the lids.
- Next, you must add a nutritious substrate to give the mushroom spores the right growing conditions. To do this, mix ¼ cup of water with the ⅔ cup of vermiculite in a bowl. Later, drain the excess water and add ¼ cup of brown rice flour to the wet ingredients. Fill half of the jar.
- It is essential to sterilize the jar with alcohol wipes during the fungal preparation. Moreover, it is extremely necessary to add a dry layer of vermiculite on the top of the substrate. Otherwise, the solution can become contaminated.
- After screwing the lid of the jars, wrap it with the tin foil. Place a dry towel at the bottom of the cooking pot. This will help to ensure that the jars do not make contact with the base.
- Add water to the edges of the jar in the pot. Make sure that the jars remain firm in the water. Boil the water slowly in the jar. Cover the cooking pot with a tight lid, and let it steam for approximately 1 hour 30 minutes. The optimal temperature range for a stress cooker is 15 PSI for 1 hour long.
- Leave the cooking pot in its place for an overnight cooling process.
Inoculation stage
- Prepare the syringe and sanitize it properly. Heat the needle of the syringe until it is red hot. Let it cool, and then use alcohol wipes to kill any bacteria on the needle.
- Next, remove the plunger and shake it properly until the Magic Mushroom spores are at every corner of the syringe. To avoid any contamination during the process, it is recommended that you use sterilized latex gloves and masks.
- Remove the tin foil from the jars and plunge in the needle, allowing the spores to contact the substrate. Each substrate is fit to sprout the spore solution of about ¼ cc.
- Keep in mind that each injection needs alcohol sterilization for every new jar. Now, let the spores rest for a while. Do not cover the jar with foil again, but close the holes with tape.
Colonization Stage
- Place the jars in a dark place with a temperature of 36 degrees celsius.
- After two weeks, you will notice white fluffy mycelium growing out.
- Take regular notes of the color and smell of the growing magic mushrooms. Any unusual symptoms may be due to contamination.
- Inspect the growth of these mycelia after 3 to 4 weeks. If the jar has six perfectly colonized jars, give these mycelia another week to firm their roots and preserve them in the substrate.
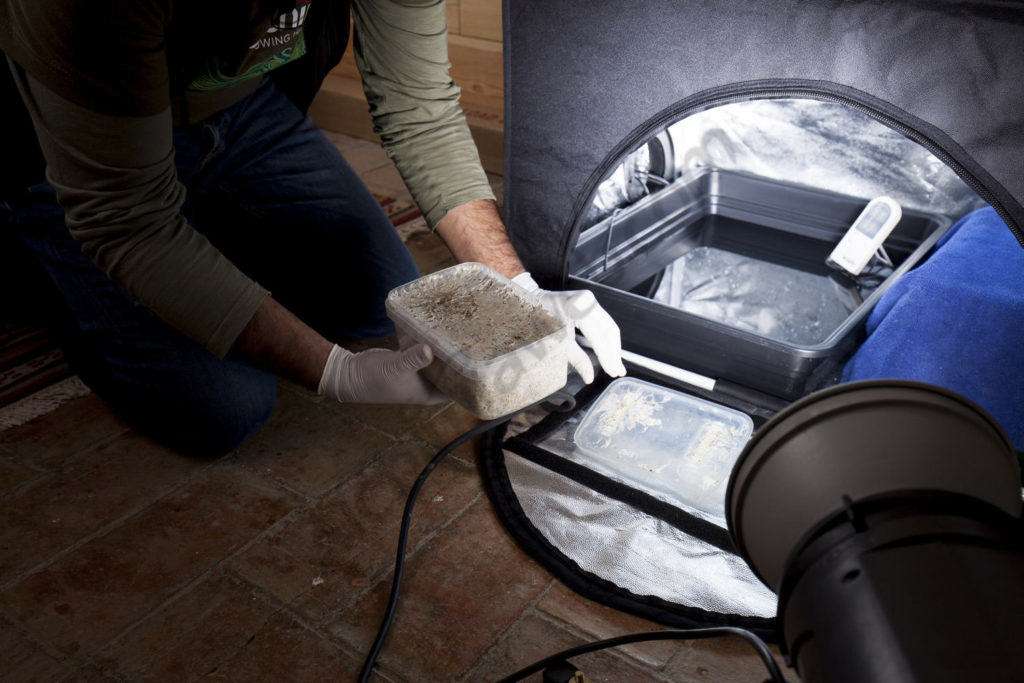
Growth chamber preparation stage
Now, all you have to do is use a plastic storage field and make ¼ inches of holes, 1 inch apart, throughout the base of the cooking pot and the lid as well.
Four objects should hold the container at the corner. This will help the air flow into the container from beneath it. There will be a lot of water excretion during the process, so cover the base of the box to avoid leakage.
After this, put the pertile in a strainer and soak it in cold running water. Remove all the water and leave it to dry. Later, empty the perlite content on the base of the growing chamber.
The pertile layer should be present after each 4-inch depth.
Fruiting stage
- Now, you can remove the dry vermiculite layer from each jar. The cakes of mushrooms should be tapped out from the jar on a disinfected platform.
- Run cold water over it to remove any vermiculite still intact with the mushroom.
- Fill the cooking pot with tepid water. Submerge the cake in the water, using a heavy object to keep it under the water.
- Rehydrate the cake for soaking it in the cooking pot for one day at room temperature.
- Remove it from the water and roll the cake in the vermiculite powder to stop moisture escaping.
- Place each cake on a tin foil rectangle in the growing chamber, ensuring it does not touch the chamber’s perlite layer. Spray water on these cakes and fan them before closing the chamber lid.
- Repeat the spraying and fanning process 4 times a day. Do not forget to give the mycelium little light and air to become a mushroom.[2]
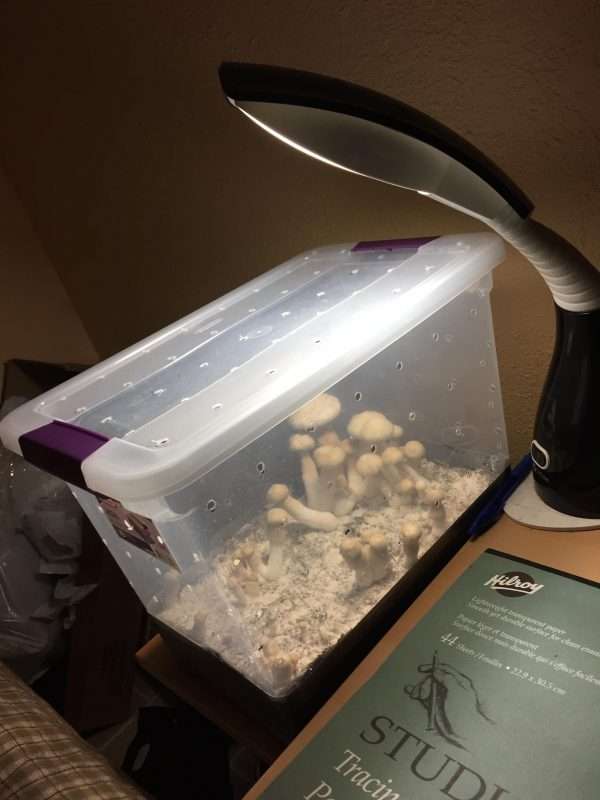
Cultivation stage
After five to twelve days, the mushrooms are ready to be harvested.
Make sure to properly cut the mushrooms, close to the cake. The mushrooms do not remain potent as they grow older so you can take them as soon as they’re ready. Harvest the crop before it breaks away from its veil and enjoy your shrooms after you’ve dried them out for a few days!
References:
[1]https://mushplanet.com/basic-cultivation/the-ideal-growing-conditions/ [2]https://thethirdwave.co/psychedelics/shrooms/grow-psilocybin-mushrooms/